
Pressure System Toolkit
Taking the basics of the system and trying to explain it and decouple it from a World Setting.

I’ve decided to pivot on the Pressure System lately. This was spurred on by a video/podcast by Runhammer
In this talk he asked the question “Does your Mechanic Matter?”. He ends up defining three questions that need to be answered to know if the mechanic itself actually matters:
Is it exciting? (Or is it awesome)
Does it create a dilemma?
Is it easy to remember?
This got me thinking about how I go about designing my own game. What it challenged me to question is
“Do I need all the window dressing of a setting and lots of rules to tell me how to do things?”.
I’ve sort of come to the conclusion of no. I don’t need to give you a setting, and I don’t need to give you the specific rules of this is how this works.
What I need to do is just give you lots of options and suggestions on how the mechanic can work. Then you have the power to make rulings and your own setting on the fly. Let’s get started and show you what I mean.
Pressure Die
What the hell is it? It’s a die, usually a d6, d8, d10, or d12 that is going to represent the challenge in the scenario or encounter that your Player’s find themselves in. Here are different example cases for it:
It could be the entire encounter is the same Pressure Die like DC/TNs in ICRPG
It could be that every zone/room during an encounter has a different Pressure Die
You could have every Monster/NPC/Trap represented by a different Pressure Die
You can have a mix of any of the above.
Check vs Effort
You have two types of rolls in the Pressure System. The first type is when you are wanting to just check if something is possible. These rolls are perfect for quick yes-or-no situations or stuff you don't wanna spend too much time digging into.
I think it’s important as a GM to ask this question prior to a Check.
“Should I just say yes?”
Do you think there’s fun/drama in the chance of failure? Do you have an idea of what will happen if the players fail? If you can answer yes to these, then let’s make a check!
Check = The player is going to roll the Player Die and the Pressure Die. If the Player Die is equal to or higher than the Pressure Die then you pass the check
The second type of roll in the Pressure System you might make is an Effort roll. Similar to ICRPG this is when you are trying to overcome a challenge. You are trying to defeat an enemy, disarm a trap, lift the gate high enough for the orphans to slide under, or win a debate. Whatever you think requires Effort and time to accomplish.
Effort = The player is going to roll the Player Die and the Pressure Die. If the Player Die is equal to or higher than the Pressure Die then you add the results of both die together to determine your effort. If the Player Die is less than the Pressure Die then you only receive the Player Die result as your effort.
Basic Math for Checks & Effort
Checks
When it comes to a check we just want to know the % chance that we can beat the other dice. On top of that there are three %’s that we’re looking for.
65-70% - you are highly skilled, and proficient
45-60% - you have some competency
35-40% - you are unskilled
These are the basic percentages based on older iterations of D&D, and the numbers that Dungeon Craft describes as the perfect numbers in his videos. Stating that 8 is usually the perfect number to roll over on a d20.
Remember, with checks there needs to be something exciting whether you succeed or fail. Nothing worse than failing on a roll and then nothing happens
How do we get these numbers with the Pressure System dice?
You can see here that:
Proficient/Skilled = Player Die is 1 step higher than Pressure Die
Competency = Player Die is equal to the Pressure Die
Unskilled = Player Die is 1 step lower than the Pressure Die
Effort
Let’s look at Effort’s statistics. We aren’t looking at a threshold for success when looking at Effort. We are trying to determine what feels like a good amount of effort for a given task based on someone’s proficiency. How long should something take?
The following charts are looking at the percentage chance that you will do at least a certain amount of effort.
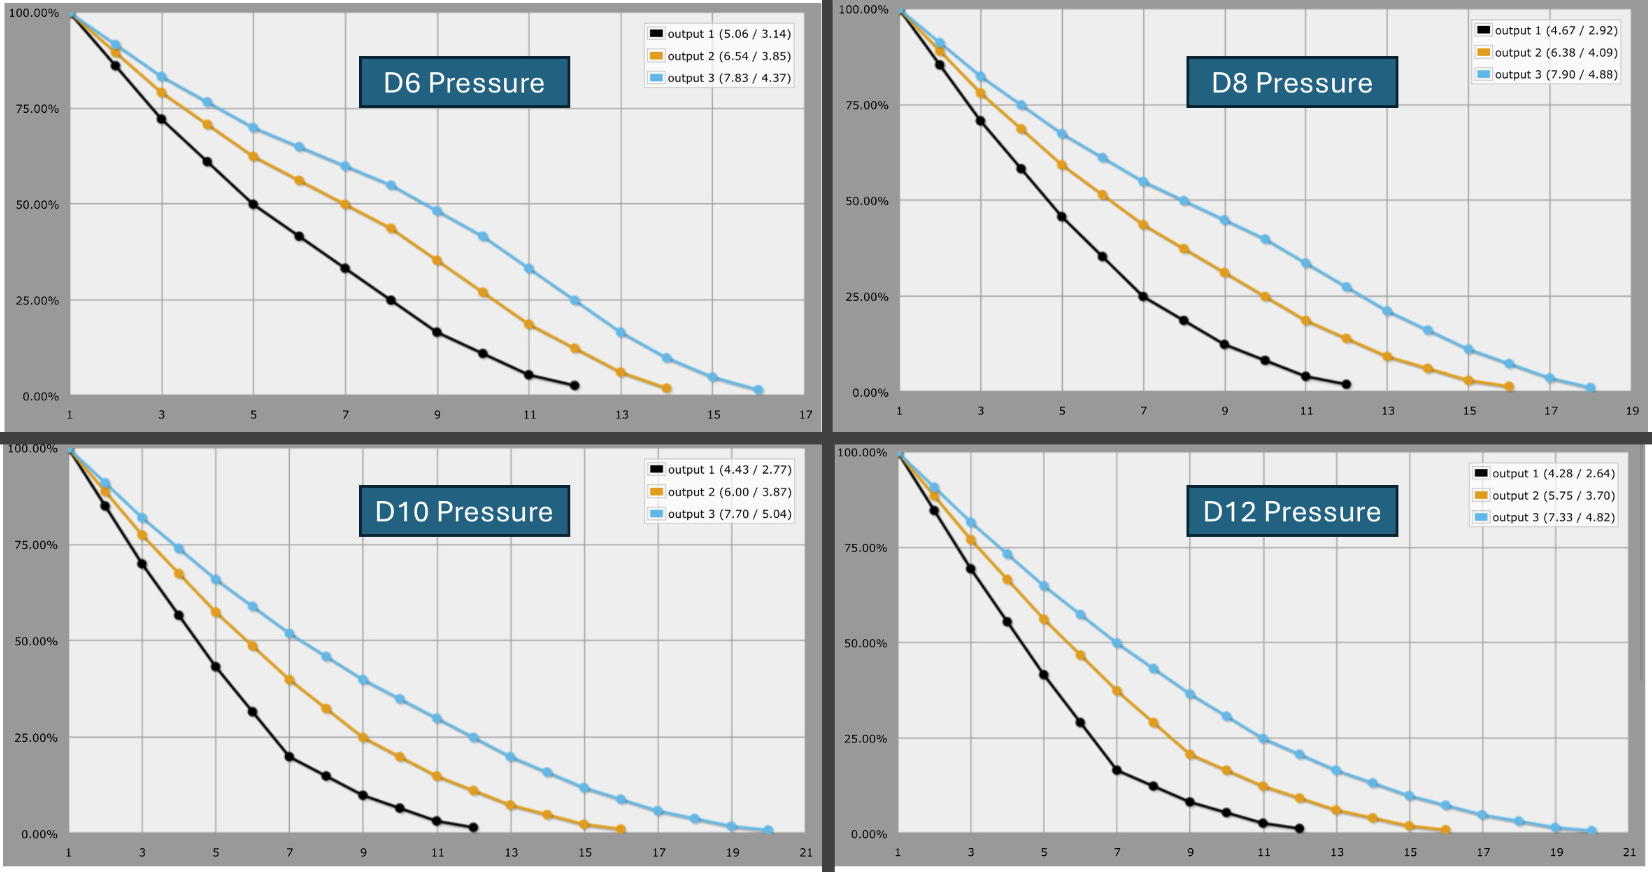
What we see is that the average total amount you can produce doesn’t really change that much based on the Pressure Die. The average amount a player will do with a d6 Player Die against a d6 Pressure Die is 5.06. When that d6 Player Die rolls up against a d12 Pressure Die their average amount is now 4.28. There is a shift down, but it’s maybe 15% shift? If we look at the d10 Player Die performance it goes from 7.83 to 7.33. Even less of a shift. But, what’s interesting is the actual % chance of rolling different amounts. Look at the graphs below.

Let’s look specifically at the d6 Pressure Die results. Even though the average might be 5.06, according to this, 30% of the time you will roll 1 or 2 as your result. Then an additional 22% chance you roll a 3 or 4. You are capable of rolling a 9-12, but the chances of rolling in that range is 15%. What gets interesting is the weird curves that occur when the Player Die is a d8 or d10.
The d8 has an average of 6.54, but the chance of rolling a 1-3 is 30% roughly, but then 8-10 is a 24% also. You could end up doing massive effort just as likely as low effort.
The d10 is similar. It has a 21% chance of doing 1-3 effort, but has a 24% of doing 10-12 effort. The reason this occurs is because the chances of the d8 and d10 rolling higher than the d6, while the d6 also a high number is greater. So this is pretty fun.
Now, this phenomena starts to flatten out more as the Pressure Die gets higher. You can see the charts continue to create more of a downward slope, but what I think is cool is that the d6 has a sharp decline against the other dice continually, which makes sense because it should be the unskilled dice representation. So your ability to apply Effort to something should decrease.
What does this mean to us in terms of “What should target efforts be, and how does the Pressure Die affect those numbers?”

Above is the estimated output that a party of 3 can do if they all have 1 action providing Effort with the against the Pressure Die on the left
All unskilled = d6 Player Die
One Skilled = d8 Player Die and 2 d6
All Skilled = d8 Player Die
One Expert = d10 Player Die and 2 d8
All Expert = d10 Player Die
Here is what the graphs for these numbers looks like when fully plotted out for the possible output that these individuals can perform.

So what does this end up meaning for us? It means, that if you’d like an unskilled party to be able to complete a target in 1 round then having the Effort needed fall within the 10-20 range gives them a chance. Better yet, how can we divide that up?

Expanded Efforts
Let’s look at Effort for all situations

Let’s expand this further. The following chart would show how much Effort different sized groups (1,2,3,4) would have to spend in order to eliminate enemies over different sets of rounds (1-5), and its broken into Easy/Medium/Hard.
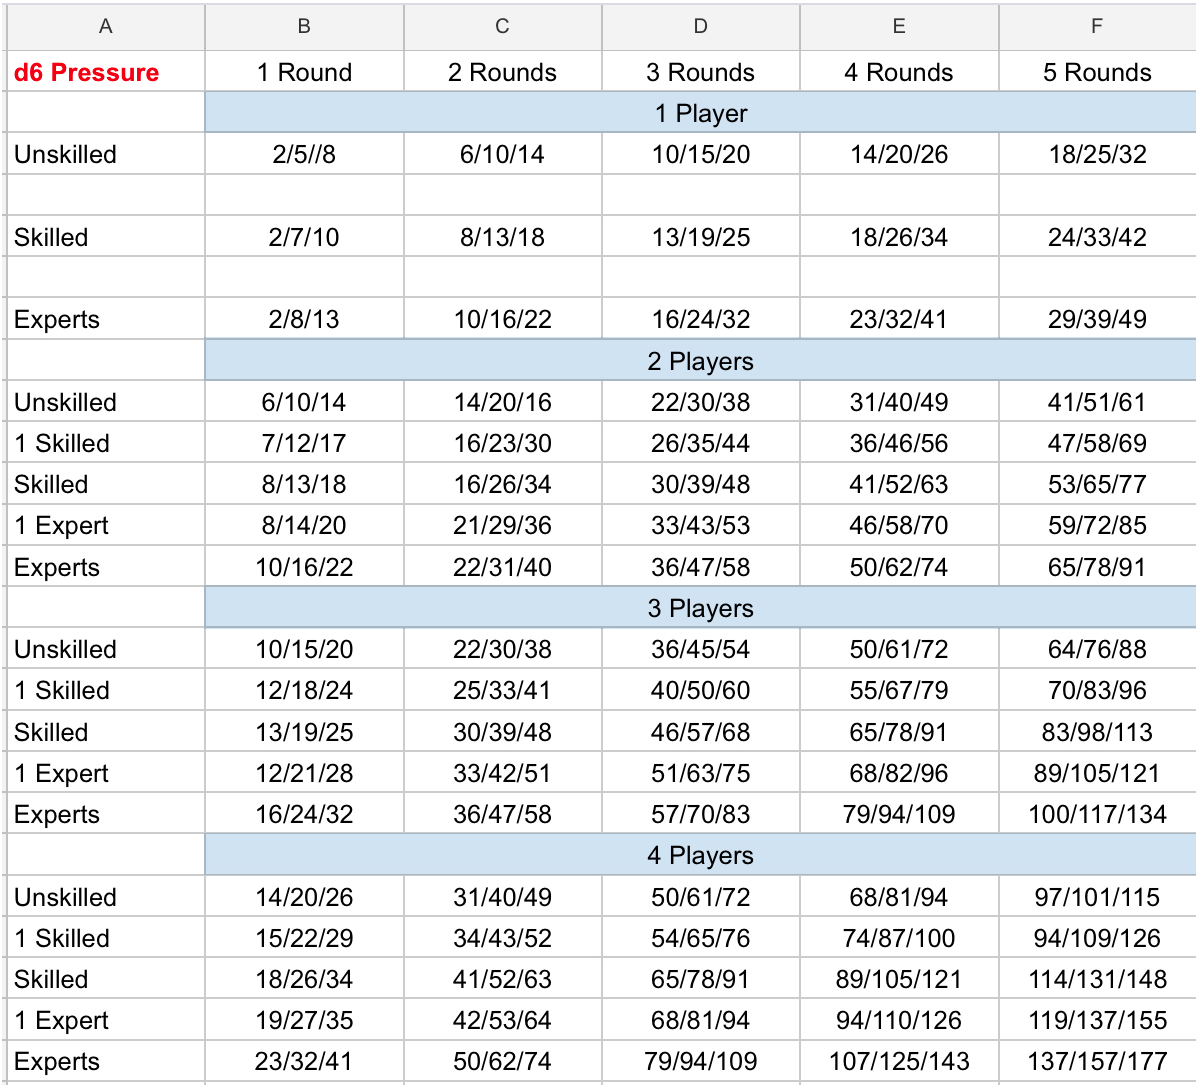
This chart brings up some interesting questions. Do you need to know individually what everyone can handle? Meaning, I want 4 bad guys that take about 2 rounds each, and a gate that needs 2 rounds to unlock…etc. OR, do you just say this is a 5 round encounter for 3 Unskilled players, and it’s hard. So in total I just need 88 Effort, and I’m going to split amongst 5 monsters and a lock?
The other thing to consider is that this is only for Pressure d6. We’d have to run the numbers for how much this changes at each pressure level. So what would it look like with Pressure d12?
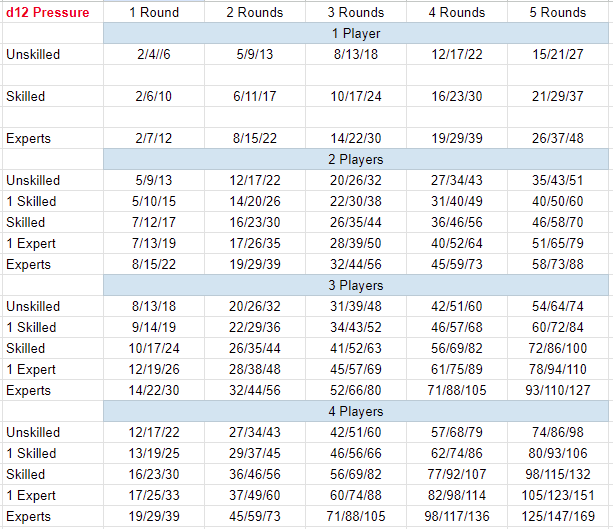
Does this make a huge difference? In general the Expert vs the d6 Pressure and the Expert vs the d12 Pressure is roughly 94% the same output, with d6 Pressure being slightly higher. When it comes to the Unskilled vs the two different Pressure Die ends up being roughly 84% the same output. You can output a lot more as an Unskilled individual against the d6 Pressure, and you lack the skill to do so against an d12 Pressure. Makes sense.
Was this an obscene amount of nuance to examine? Absolutely! What did we find out? An Unskilled person is going to roughly produce 3-6 remember, this also is resulting in less 1's, and 2's, and an Expert produces 6-9 effect. Skilled individuals would be able to put out 5.5-7.5 effort.
Using Checks & Efforts?
Checks
Effort

You would take these and multiply them with (Player Count x Rounds of Encounter)
The other use case are minions. There is an idea in TTRPGs where some enemies are incredibly easy to dispatch. In games like 4e D&D and the MCDM game these are referred to as minions. The Effort of a minion is 2. This means that they should easily be able to be dispatched, but there is still the chance you roll the 1 on the Player Die which would result in missing.
Its up to the Game Master to determine if they want to just create all the Effort needed for the entire encounter with this equation and then divide that out to the enemies. Or, if they would like to calculate each enemy or trap with this equation. Both should be viable.
Expanding and Modifying
One of the most fun parts of TTRPGs is the fact that you have powers, abilities, or just roleplay an amazing situation that is to your advantage. When this happens you end up with a Boon or Advantage. You might find a magical item, help out an ally, or all sorts of things that end up giving you some sort of bonus.
The flip side of this would be that the situation becomes dire. You may have been cursed by a spell or item, or the enemies have a tactical advantage on you. When this occurs you end up with a Bane or Disadvantage.
The following are different ways to potentially approach these Boons and Banes when using the Check and Effort mechanics.
Effort Modifiers
Pluses, Minuses
Advantage, Disadvantages
Bonus Dice
Pluses & Minuses
Pluses and Minuses are the easiest thing to add to Efforts. All it will do is increase or decrease the average potential output of the individual players. If you know that your players have a lot of pluses, and you still want to make things challenging for them, then you would just add that to the equation for determining overall Effort for a given encounter.
Player Count x Rounds of encounter x (Skill Effort Multiplier + # of Pluses).
So you have 3 Unskilled players dealing with an Indiana Jones style trap, and they need to resolve it in 3 rounds. One of them now has +2 to their ability to deal with athlete situations.
3 x 3 x (3+2) = 45 Effort roughly for an Easy situation in 3 rounds
Advantage & Disadvantage
Banes & Boons, or Advantage/Disadvantage is another way to add some randomness to your game. These are bonuses that are not as "known" by the player. They should result in positive outcomes, but you don't technically know how much of a benefit one of these dice will be.
Traditionally when rolling Adv/Dis you will roll an extra die, and then take the higher of the results. In 5E you roll 2 d20, and would take the higher result, which usually equated to a +3 bonus when you break down the math.
Here are three charts looking at what happens when someone has Advantage with their Effort check

Mathematically speaking, there is an interesting shift here. If you look at the 2d6 on the top left you'll find that on average you are only getting +1 effort. That isn't that big a deal overall. BUT...what's interesting is when you compare it to a plus +1 modifier.

In this graph you'll see that the Orange line is a normal d6 Player Die vs a d6 Pressure Die. The blue line is if you get a +1, which, you can see shifts its total by 1, and gives you an average of 6.06 effort instead of 5.06. Now, the Black line is the Advantaged effort. It also is slightly higher at 6.68, BUT, the most impactful part is that your chances of getting really low rolls is far reduced. You now have less chance of getting those 1, and 2s.
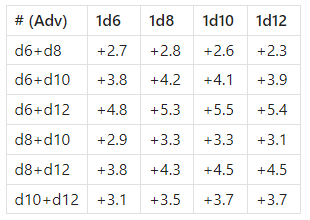
Here is in essence the shifts with advantage you would have against the different types of pressure die.

Now, is the same the case for disadvantage? Is it a similar shift downwards? The answer is yes. Its pretty brutal to get Disadvantage. Your odds of a 1 or 2 are now very high, and you are shifted roughly the same backwards as you were forwards in that chart.
Special Advantage & Disadvantage
There is also another way to use Advantage and Disadvantage. You can instead use a different dice to roll with your Player Die and take the lower or higher of the two. Well what does this do for you? It makes it so those +'s and -'s aren't as drastic potentially, but you can still reduce the rolling of 1's and 2's.

So what does this now tell us? This is actually really cool. What we get here are ways to reduce the major benefits of Advantage, but retain the fact that you aren't rolling all those 1's and 2's. This could be that you are slightly more efficient at something. Just giving someone a d4 Advantage (even though we all hate rolling them) will only give that person a 0.3-0.4 increase in average Effort, BUT, it drastically reduces the amount of times they do 1 or 2 Effort. Pretty cool.
What happens when we give you bigger dice for Advantage?
This gives you a great way to start to really give people a boost. Its also going to increase the maximum potential damage they do, even though those numbers might be small in terms of percent chance they occur.
Bonus Dice
Finally there is another easy solution to just increasing someone's Effort, and that's letting them roll an extra dice they just add to their overall results. The increase Effort from this is easy to calculate since its just the average result on a die roll.
There is probably a much greater chance with the additional Bonus Die to have massive Effort increase.

Here is a chart of 1d6 + 1d12 advantage in black, and then 1d12 Bonus Die just added after the effort roll in orange. The Advantage gives you a better chance of hitting that average effort (9-12), but the Bonus Die gives you a lot more potential top end effort.
Check Modifiers
Pluses, Minuses
Advantage, Disadvantages
Adjusting the Pressure
At this point in time you should be very familiar with the math, so let's get right into the charts.
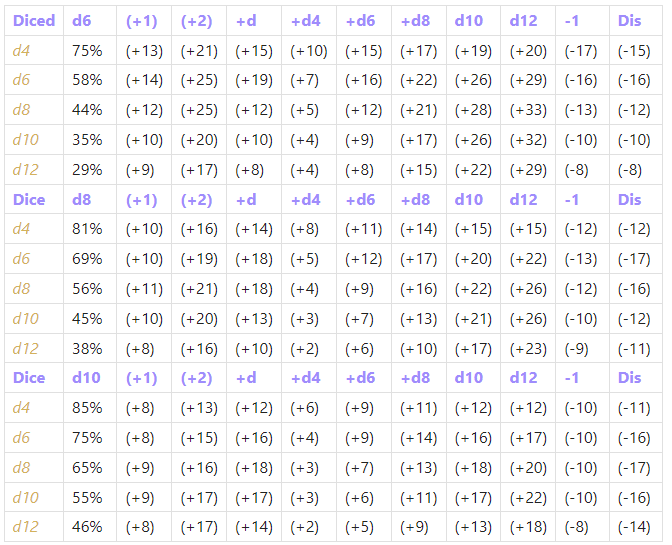
In purple you will see the Player Die followed by the different ways it is modified. This is adding bonuses (+1, +2), or you giving it Advantage. The +d means giving it standard advantage, and the +d# means rolled with that specific die for advantage. The yellow dice along the vertical first column represent the Pressure Die that the check is against. You can then see the % shift that the Player Die gets from its base % chance.
Looking at this table there is a lot to unpack. When it comes to checks, +2 is amazing. Using any pluses and minuses is going to really shift the results. If someone ends up with a -1 or -2, I'd also try to give them some sort of advantage so that there is the potential of those canceling as much as possible, but the drama hopefully is ratcheted up. Looking at +1, you can see that its VERY good for Unskilled players against lower challenges, but then it levels off and is about the same as Advantage.
Takeaways. +d4 advantage is a nice way to give a bit of a boost. Pluses and Minuses are major changes to results. Advantage straight up or with a higher dice will allow you to really do well. But let's translate this to our original goals of..
65-70% - you are highly skilled, and proficient
45-60% - you have some competency
35-40% - you are unskilled

You'll notice that Bonus Die are not being used to modify Checks. This is mainly because when you add those to Checks they become way too good.
Adjusting the Pressure
This was actually my player's favorite way to manipulate Checks. Instead of giving themselves some sort of bonus they would use abilities or actions to reduce the actual Pressure in a given situation. The reason was that it not only increased their chance, but could also improve or help their allies.
Each of these examples of modifiers can have variable time components on them. They might last the round, they might last just 1 action, they might last the entire encounter. They could be just for 1 player or all the players. That would lead us into examples of powers or abilities.
Summary of Modifying Checks and Effects
For Efforts you can give people +'s or -'s and you know exactly what you will be getting from them. Its not that variable in nature. If you want to make them feel a bit more potent give them a low Advantage type like a d4 or d6 just to eliminate those pesky 1 and 2 effort rolls. The bigger the Advantage die the more you are going to be stacking on. If you want them to feel like they get some of those massive hits or efforts then give them a Bonus Die to roll along with their Player Die that just adds to the result.
For Checks you wont truly challenge the players unless the Pressure Die is equal to or a step higher than their Player Die. That's when you will make them feel less skilled. If they have +1 or +2 they will feel comfortable against a Pressure Die equal to or even 1 step higher than their Player Die. In these situations you can make the Pressure Die even bigger, or try to negate the bonus slightly with a disadvantage. The other concept that can help this is to actually give the Pressure Die advantage. We haven't done the math on that yet, but it could make things VERY interesting.
Disadvantage can also be used on players in a way that isn’t as painful as in other games. You can utilize very large dice like d12s to give less of a negative effort. See the examples of a d6 or a d8 vs a d6 or d8 with and without disadvantage d12

The d12 is not as likely to roll lower than the d6 or d8, so you aren't as often penalized for it.
Examples of How to Use these Mechanics
I'm going to just start listing out lots of random ways you could quickly use these mechanics to demonstrate what you'd like to do in a game. Let's just dive right into it.
You'd like to create some sort of reckless attack ability for a Barbarian style character? How about you have +Disadvantage d12 on your attack but you get +d12 Bonus Die Effort?
You have 4 players coming over and you have 3 ideas for encounters to run for them. You list out the ideas for the first encounter. Let's say its a combat encounter, and you decide to make it an ambush with lots of Minions and Ranged combatants, and maybe 1 big baddy. You want this to be exciting, but not take too much of the evening. You decide to make it a 3 round encounter roughly for the 4 players, and make it easy for their Unskilled party.
4 x 3 x 5.5 = 66 total Effort.
Let's just say the 5 Minions are all 2 each, the 2 ranged archers are 15 each, and that leaves 26 for the bigger guy. You set the Pressure to d6 on the entire encounter but make the bigger guy a d8 for fun.
You want magic in your system. You like bigger numbers, and you like how ICRPG does their system. So, you just port that into your game.
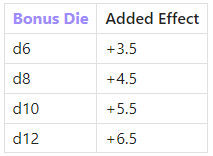
Weapons do Bonus 1d6 effort
Guns do Bonus 1d8 effort
Magic & Energy is Bonus 1d10 effort
Ultimate badassness is Bonus 1d12
To compensate for this you add +3.5 to all Skill Effort Multipliers because that's the average damage bonus for d6's (general weapons) and off you go.
Your player is going to throw a flash bang. They see all the bad guys are now huddled up, and they want to infiltrate the room. You don't make them make a check, you think its a good idea. You then say that the room is no longer a Pressure Die of d10, but is now a d6 because everyone in the room is blind. You also give all the players +2 for their Effort because the enemy is blind currently when trying to defend themselves.
Conclusion
There it is. Pressure System Toolkit. It should technically be a sandbox for making any rules you want. You could use any attributes, and skills, and weapons or powers. It all is just resolved in this manner. When it comes to how your players take damage or defend themselves it can be variable as well. Do they role checks to defend themselves? Do the enemies roll Effort Dice? Maybe monsters just do static damage? Or maybe they do tags, or stress, or whatever you'd like. Maybe the monsters just roll d20s and you have an AC they are up against. Maybe your AC is just extra health like the MCDM toolkits. The hope is that this gives you the base toolkit of the pressure system for the Players to interact with, and it gives them a fun new mechanic that can give a feeling of stress to it.
That’s it. I’m tired….I’ve been staring at numbers and charts for days and I’m going to bed now. Enjoy
Did you not intend to address the 3 criteria Runehammer brought up?
Otherwise a MVP resolution, damage, and health / encounter building system is cool, certainly hits the memorizable criterion, but I'm not sure about the first two.